
To sew a zipper, start by placing the zipper face-down on the fabric edge and pinning it in place. Sew along the edge using a zipper foot.
Sewing a zipper can seem intimidating, but it’s actually a straightforward process that anyone can master with a few simple steps. Whether you’re adding a zipper to a jacket, dress, or bag, the basic technique remains the same. It involves carefully measuring the length of your zipper, pinning it in place along the fabric edge, and then sewing it in using a zipper foot attachment on your sewing machine.
With a bit of patience and practice, you can sew a zipper that looks neat, tidy, and professional-grade in appearance. In this article, we’ll outline the basic steps you need to follow to sew a zipper successfully, every time.
Credit: weallsew.com
Understanding Zippers
What Is A Zipper And How Does It Work?
A zipper is a fastening device that is used to join two pieces of fabric together. It is made up of two parallel rows of teeth or coils, which are interlocked by means of a slider. The slider moves up and down the rows of teeth or coils, opening or closing the zipper.
The teeth or coils are made of different materials including plastic, metal or nylon. When the slider is moved up, the zipper is closed and when it is moved down, the zipper is opened.
Important points to keep in mind:
- A zipper is made up of two parallel rows of teeth or coils.
- The slider moves up and down the rows of teeth or coils, opening or closing the zipper.
- The teeth or coils are made of different materials like plastic, metal or nylon.
Types Of Zipper And Their Uses
There are several types of zippers available in the market that can be used for different purposes.
- Coil zippers: Made of nylon, these zippers are lightweight and flexible. They are commonly used in dresses, skirts, and pants.
- Metal zippers: These zippers are made of metal and are known for their durability. They are used in jackets, bags, and jeans.
- Invisible zippers: These zippers are designed to be hidden in the seam and create a seamless finish. They are commonly used in dresses, skirts, and cushions.
- Plastic molded zippers: Made of plastic, these zippers are lightweight and corrosion-resistant. They are used in rain jackets, bags, and sportswear.
Important points to keep in mind:
- There are several types of zippers available in the market that can be used for different purposes.
- Coil and metal zippers are commonly used, while invisible and plastic molded zippers are used for specific purposes.
- The choice of the zipper depends on the type of garment or project you are making.
Choosing The Right Type Of Zipper For Your Project
Choosing the right type of zipper is crucial to ensure that your project turns out to be perfect. Here are a few things you should keep in mind while selecting a zipper for your project:
- Type of project: Consider the type of garment or project you are making before selecting a zipper. Decide if you need a zipper that is visible or hidden.
- Weight of the fabric: Choose a zipper that is strong enough to withstand the weight of the fabric. Heavy fabrics require stronger zippers.
- Length of the zipper: Measure the length required for your project carefully before selecting a zipper. Make sure you choose a zipper that is slightly longer than required to avoid any mishaps.
- Color of the zipper: Choose a zipper color that matches the fabric of your project. If you cannot find the exact match, choose a color that blends in well.
Important points to keep in mind:
- The right type of zipper is crucial to ensure that your project turns out perfect.
- Consider the type of garment or project you are making before selecting a zipper.
- Choose a zipper that matches the weight, length, and color of your fabric.
Getting Ready To Sew A Zipper
Sewing a zipper can be a daunting task, even for experienced sewers. However, with some preparation and the right tools and materials, you can make sure your zipper turns out perfectly every time. In this section, we will go over the steps you should take before sewing your zipper.
Preparing Your Fabric For A Zipper
Before you can start sewing in your zipper, there are a few steps you should take to prepare your fabric.
- Start by ironing your fabric. Make sure it is free of any wrinkles or creases, which can cause your zipper to go in crookedly.
- You should also consider stabilizing your fabric. When you sew in a zipper, you are creating a small area of stress on the fabric, and stabilizing it will help ensure it doesn’t stretch or warp. You can use a stabilizer like interfacing, or even just a piece of tissue paper.
Tools And Materials Needed
In order to sew in a zipper, you will need a few specific tools and materials.
- A zipper, of course! You should choose a zipper that is the right length for your project, and ideally one that matches the color of your fabric.
- A sewing machine is also necessary. You can technically sew in a zipper by hand, but it will be much more time-consuming and won’t look as polished as using a machine.
- You will also need a zipper foot attachment for your sewing machine. This special foot is designed to help you sew in zippers more easily.
Measuring And Cutting Your Zipper
Once you have your fabric prepped and your tools and materials ready, it’s time to start measuring and cutting your zipper.
- Begin by measuring the length of your project where the zipper will go. Make sure to add an extra inch or two to allow for easy opening and closing of the zipper.
- Next, mark where you want the zipper to go on your fabric. You can use a fabric marker or pins to do this.
- Use your fabric scissors or rotary cutter to carefully cut your zipper to the correct length. Be sure not to cut too close to the zipper teeth!
By following these steps and preparing your fabric and tools properly, you’ll be ready to sew in your zipper with confidence.
Sewing A Zipper Into A Garment
Can be a daunting task if you’re a beginner. But with a few tips and tricks, you can complete this task like a pro. In this blog post, we’ll guide you on how to sew a zipper into a garment.
We’ll break down the process into three parts: pinning your zipper in place, sewing the zipper to your fabric, and finishing the ends of your zipper.
Pinning Your Zipper In Place
Before you start sewing your zipper, it is essential to pin it in place. Follow these steps to pin your zipper:
- Place your zipper on the fabric where you want it to be.
- Align the edges of the fabric and the zipper and pin them together.
- To make sure the zipper stays in place, you can also put a few pins on the sides of the zipper.
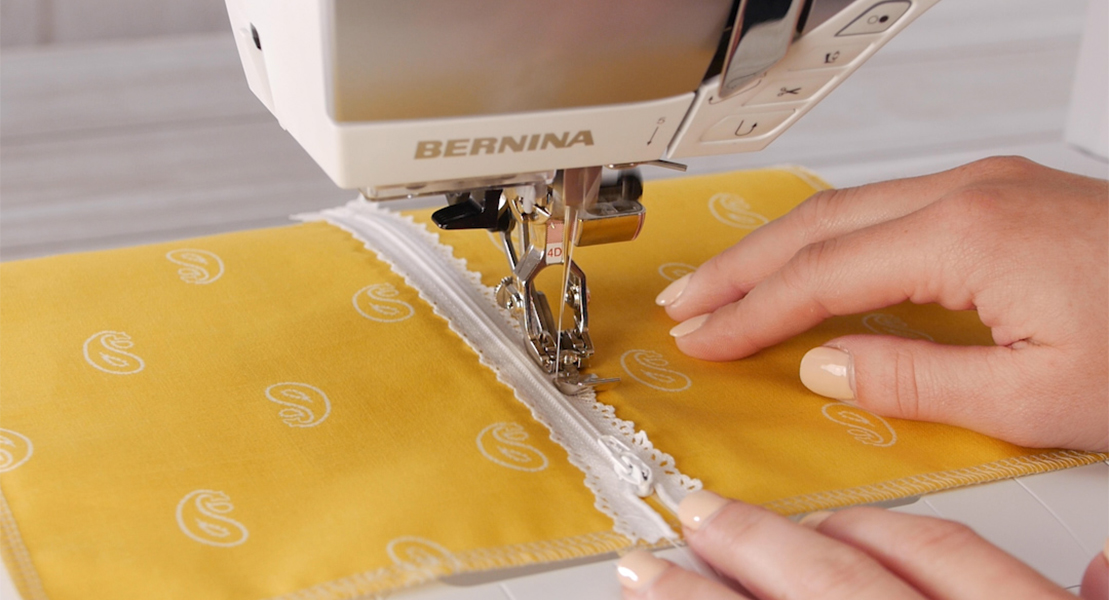
Sewing The Zipper To Your Fabric
Once you have pinned your zipper, it’s time to sew it onto your fabric. Here is how you can sew your zipper:
- Start at the top of the zipper and sew a few stitches across it. This will secure the zipper in place.
- Use a zipper foot on your sewing machine to sew along the zipper teeth. Make sure you are sewing as close to the teeth as possible.
- Sew until you reach the end of the zipper.
Finishing The Ends Of Your Zipper
To finish the ends of your zipper, you can follow these steps:
- Fold the end of the zipper tape towards the wrong side of the fabric.
- Sew a straight line across the zipper tape’s end to secure it in place.
- Trim off any excess zipper tape.
By following these steps, you can successfully sew a zipper into your garment. Remember to take your time, use pins, and sew slowly if needed. With practice, sewing zippers will become easier and more natural for you.
Troubleshooting Common Zipper Issues
Zipper is an essential part of any clothing. Whether you’re sewing a dress, skirt, or jacket, you need a zipper to complete the look. But what do you do when the zipper won’t close, or the pull keeps falling off, or it’s crooked or uneven?
Don’t worry; we’ve got you covered. Below are some of the most common zipper issues and how to troubleshoot them:
Zipper Won’T Close Properly
If your zipper won’t close properly, it can be frustrating. But don’t worry; there is a simple fix for it. Here are some of the solutions:
- Check if there are any obstacles such as thread or fabric caught in the zipper teeth.
- Apply some lubricant like soap, candle wax or lip balm, and then try to zip it up.
- Check if the teeth are properly aligned. If not, use pliers to straighten them out.
- In case of metal zippers, check if any of the teeth are missing or broken. If so, replace them using pliers.
Zipper Pull Keeps Falling Off
A zipper pull that keeps falling off can be a real pain. Here are some troubleshooting tips that can help fix this issue:
- Check if the slider is too loose – if yes, use pliers to pinch it together gently.
- If the slider is damaged, try replacing it with a new one.
- You can also use a keyring or a paperclip to loop through the hole on the top of the slider and create a makeshift pull.
Crooked Or Uneven Zipper
A crooked or uneven zipper can make the garment look unprofessional. To troubleshoot this issue, follow these steps:
- Look at the garment from all angles to find the unevenness.
- If the issue is around the waist or hip area, make sure that the edges of the fabric are correctly aligned.
- You can also adjust the seam allowance to ensure that the zipper is positioned correctly.
- If the fabric stretches or gets distorted, try interfacing it to give it more stability.
By following these simple troubleshooting tips, you can solve most common zipper issues yourself, without having to take it to a tailor. Happy sewing!
Frequently Asked Questions Of How To Sew A Zipper
How Do I Sew A Zipper Onto Fabric?
To sew a zipper onto fabric, mark your fabric where you want the zipper to be and then place the zipper on the marked line and pin it in place. Using a sewing machine, stitch each side of the zipper to the fabric.
What Are The Types Of Zippers?
The types of zippers include coil zippers, metal zippers, plastic-molded zippers, invisible zippers, and open-ended zippers. They come in different sizes, lengths, and colors, and are suited for different types of garments and materials.
How Do I Shorten A Zipper?
To shorten a zipper, measure the length you need and mark it with a pin. Sew a few stitches horizontally across the zipper teeth at the pin mark. Then, cut off the excess length below the stitches, and sew a new stopper over the cut edge to prevent the slider from falling off.
Conclusion
Learning how to sew a zipper can seem intimidating at first, but with practice, it becomes a rewarding skill to master. Remember that preparation is key, so always measure your fabric and zipper properly before sewing. Use the right needle and thread, and take your time to sew slowly and accurately.
With these tips, you can confidently create garments and accessories with zippers that look professional and polished. Keep exploring your creativity by experimenting with different types of zippers and fabric, and challenging yourself with more complex projects. Sewing is not only a useful life skill, but also a form of self-expression, and every successful project is a source of pride.
So go ahead and start sewing that perfect zipper, knowing that the possibilities of what you can create are endless!